Migrating from WordPress to Ghost

I don't particularly relish the notion of moving my blog from one platform to another, nonetheless I feel the time for change has come. WordPress works for a lot of people and is easy to use, but it's become a complex and bloated mess under the hood. Its php templating system confounds and running a MySQL database just to put words on a page seems nuts to me. In the past I've used free blogging services such as Blogger and Tumblr, but was concerned about the long-term viability as they lacked a sustainable business model. As someone who is working at a start-up with the intention of offering a valuable service in exchange for money from customers, I try to avoid potentially unstable venture capital funded services.
Many of you are likely familiar with static blogging engines like Octopress, Statamic, or Jekyll. Unlike WordPress, they don't require a relational database behemoth like SQL. These systems work based on text files with a backend that generates the HTML and builds a page, so overhead and complexity are reduced considerably. I have explored all of the alternatives out there and have not been happy with any of them. The upfront command driven configuration was annoying and they lacked an easy WordPress import tool.
Enter Ghost
Ghost is a very interesting blogging platform that aims to simplify and overcome a lot of hurdles that burden the aforementioned alternatives. The platform has yet to reach a 1.0, however, with the recent 0.5 release, they've made quite a slew of enhancements such as multi-user support, a robust JSON API, and a switch to Ember.js, a framework for developing web apps that offer desktop-esque experiences. The additions and bug fixes are not quite appropriate to enumerate here and I recommend reading their post.
Migration
There are some issues I encountered during the migration that I didn't expect, but that was my fault as I didn't check to make sure Ghost had all of the features I needed. None the less, I've decided to stick with it as I have everything running nicely. To move from WordPress, I installed their official plugin which exports the contents of your posts in a formatted JSON file. They recommend that if you have posts with images, you should install Cloudinary's plugin. Cloudinary is a CDN network where you can host images. You can create a free account with some limitations if you have small image hosting needs. Make sure to upload all of your media library to Cloundinary before exporting (the plugin provides a bulk upload feature). Once your images are mirrored, any posts that contain images will have their links replaced with where they reside on Cloudinary. This is not a huge deal for me as an overwhelming majority of my posts are just text. I didn't want my images hosted anywhere else other than on my own server, so I manually corrected some posts that contained links to wp-content.
Installation
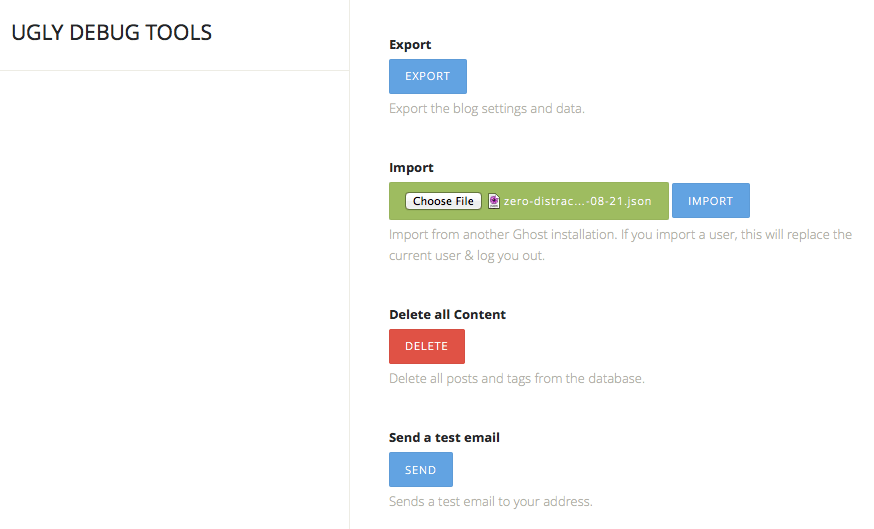
My server is with WebFaction and they have a one-click installation option, so this made things dead simple. If your webhost doesn't have one click install, the manual method won't take you much longer to do. Within a few minutes I had Ghost running. To import my WordPress JSON file, I went to enterdomainhere.com/ghost/debug (where enterdomainhere is your real domain). It only took a few seconds for it to import 425 posts. Once the posts were uploaded, I looked into URL redirects to make sure my existing RSS feed wouldn't break for my readers. As it turns out, the developers smartly included a redirect for /feed which is the default path for RSS on WordPress.
Drawbacks
Ghost is still very early days, and thus lacks some features you may have taken for granted in other platforms. For example, there's no built-in archive or search, nor is there any way to do link blogging. There are other annoyances that I encountered such as the lack of support for Smartypants, which means all of my posts that contained -- don't render as an em dash. The dashboard has no way to search through posts, which is kind of weird, even for a product in early development. There's infinite scrolling which reveals more content as you scroll down the list of posts, but trying to find something I want edit from twelve months ago is nigh impossible. It's likely that a lot of these problems will get ironed out and will be built into the core, while others may require someone to write a plugin. You can check out their publish roadmap by visiting their Trello board. Once thing I appreciate is their willingness to communicate and share what they're working on; this instill confidence in me as a customer.
There is a plugin system available to extend functionality, but the ones available are few and far between. There is no one click install for plugins like I've been used to in WordPress. For example, there was a plugin I wanted to use that inserts related posts at the bottom of a post page. This requires me to upload some javascript files and instantiate them by updating the default.hbs template. This is not difficult to do, but it's more work than clicking a button, which is what the average user needs. In development is an apps framework, which I discovered by poking around in the content folder. There doesn't seem to be any information about what this will do and how it differentiates from plugins, but it certainly piqued my interest.
Design
Instead of building my own theme from scratch, I decided to use the default Casper theme. Ghost ships a very clean and uncomplicated template. The Handlebars templating system is not difficult, though it did take a couple of hours to get used to working with it. Logically I find it makes sense and is much easier to work with than WordPress. I implemented my own design and typography tweaks and also added a menu, which is not part of Casper. Adding a menu turns out to be incredibly simple. All I had to do was add a menu.hbs file in the partials folder, add the link structure, and then instantiate it by adding the {{> menu}} data accessor in the index.hbs file after the closing tag. The data accessor tells Ghost to output the contents from the corresponding template.
Here's the menu code I used:
I then added some CSS to style the menu (style it as you wish):
.main-nav {

position: relative;

padding: 35px 40px;

margin: 0 0 30px 0;

}
nav.main-menu {

flex: 0 0 auto;

margin: 0 auto;

width: 100%;

margin-bottom: 6rem;

text-align: center;

}
nav.main-menu a {

text-decoration: none;

}
nav.main-menu ul {

margin: 0 auto;

padding-left: 0;

}
nav.main-menu li {

display: inline-block;

font-size: 2.0rem;

font-weight: 800;

font-variant: small-caps;

}
nav.main-menu li:before,nav.main-menu li:last-child:after {

transition: opacity 0.25s linear;

display: inline-block;

content: "●";

margin-left: 1.0rem;

margin-right: 1.0rem;

color: #000;

opacity: 0.1;

}
nav.main-menu li:hover:before,nav.main-menu li:hover:after,nav.main-menu li:hover+li:before {

opacity: 1;

}
The last two items on my list were to add fav icons and search. I first uploaded a 16x16px .ico file to my /assets directory. Adding the leading slash is important as it tells Ghost not to use the default fav icon in the shared folder. It's pretty common now to include a higher resolution favicon for iOS devices, so I included the Apple touch version, which is a 64x64px PNG. This is handy for people adding my site as a bookmark on an iOS device.
The search form I'm using is powered by DuckDuckGo. I began by editing the default.hbs file and added the form code right after the {{{body}}} tag.
``
I then styled the form with the following CSS:
.ddg {

font-size: 1.5rem;

flex: 0 0 auto;

margin: 0 auto;

width: 100%;

height: 38px;

margin-bottom: 6rem;

text-align: center;

}
.ddg input {

-webkit-box-sizing: border-box;

-moz-box-sizing: border-box;

border-radius: 50px;

border: #DFDFDF 1px solid;

padding: 0.9rem;

transition: box-shadow 0.5s;

}
.ddg input:hover {

box-shadow: rgba(0,0,0,0.05) 0 0 0 3px;

transition: box-shadow 0.25s;

}
Upgrading Ghost on WebFaction
If you use WebFaction's one-click installer, the following steps will allow you to upgrade your installation. Remember to backup your data before doing an upgrade!
- Open Terminal in OS X and change directories to yoru Ghost installation. E.g.,
cd ~/webapps/appname/ghost Upload the latest version of Ghost via SFTP to this directory.
Unzip Ghost by using the following command:
unzip -uo ghost-0.5.6.zip(note the version number here needs to correspond to the version you uploaded)We need to tell NPM to update and install packages for Ghost. To do that, enter the following command:
../bin/npm install --productionNow restart the Ghost service to see the changes. Use the following command:
../bin/stop && ../bin/startOpen up your browser and check to see if your website is running. You can go to Settings > About and verify the version you're running.
Coda
If you're looking for a simple blogging tool that allows you to easily publish your words without bells and whistles, then Ghost is an excellent candidate. If you don't feel comfortable making the move, you can monitor their development cycle to see if they plan on adding features you need.